Sure, there’s still a chill in the air, but spring is upon us so let’s start our spring training! Now that Daylight Savings Time has hit, the days will soon be warmer and longer, and we’ll be hitting the range more often. If you’re like me, you didn’t get to spend much time at the range over the winter, despite promising yourself that this would be the year you’d keep up your skills to get an early jump on spring. While I did spend a few exhilaratingly cold days at the range, I did not get out there as often as I’d promised myself I would.

“Armed and In Charge” is sponsored by Lasermax.
It makes no difference whether you’re a new shooter, a competitive shooter attempting to get ready for the 2016 season, or one who, like me, might be a tad rusty coming off the winter, there are several ways to get your skills back up to snuff in no time at all! Let’s get started with some spring training.
Spring Training Dry Fire Drills
A great place to start is with some dry fire drills. These are an excellent way to get some practice in while the days are still chilly or rainy. I find that dry firing helps bring back muscle memory that may have gotten a little foggy over the winter.
Any time you’re going to practice dry firing, make sure your pistol is completely unloaded and safe to dry fire before you start. I like to fill my magazines with Snap-Caps when I’m dry firing.
One of my favorite dry fire drills is to draw from my holster, acquire my target, fire and then re-holster, all while never taking my eyes off of my target. When I’m walking around my house, I can decide on my target, draw, fire and re-holster, and then go back about my business. Plants, pictures, the television—they all can be worthy targets while dry firing. No need to tape up actual targets up on my walls—my imagination is way more fun!
Another down-and-dirty drill I like to do is magazine changes. After working on the above drill several times, I’ll add these into the mix. Should you need more ammunition during a competition or an actual emergency, fumbling for your magazine will slow you down for sure. Being able to rely on muscle memory as you drop your existing magazine, grab your backup, tap it, rack it, and pull that trigger in a smooth, fluid motion—all while moving—will definitely be worth the time you took to practice it at home. Even if you aren’t a competitive shooter, being able to do this on the fly could save your life someday.
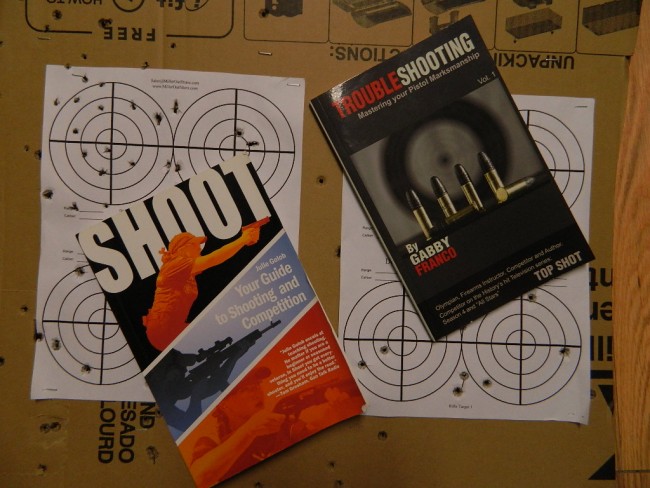
There are some drills that you can literally do anytime, anywhere. Olympian Gabby Franco, an instructor and competitive shooter, has some excellent drills in her book Trouble Shooting: Mastering Your Pistol Marksmanship. Probably my favorite—which I can practice anywhere as it does not require the use of a pistol—works like this:
Using your dominant hand, position your fingers as if you were holding the grip of a pistol (remember to keep your hand partially open). Now move the trigger finger without moving the rest of the fingers. As you can see, such tasks seem simple at first, but it is not easy to do because all fingers want to move at the same time. This is something you must learn to control. When you shoot you should move only your index finger to ensure perfect trigger control.
Spring Training Live Fire Drills
Naturally, the best thing to get your skills back in shape is to get to the range and actually shoot. (It’s also way more fun!)
I reached out to champion shooter and TeamWON colleague Julie Golob and asked her for advice on basic drills to get back into shooting after some time off. Julie is not only the captain of the Smith and Wesson team; she’s also a veteran, a hunter, and the author of the book Shoot: Your Guide to Shooting and Competition. Here’s what Julie recommended:
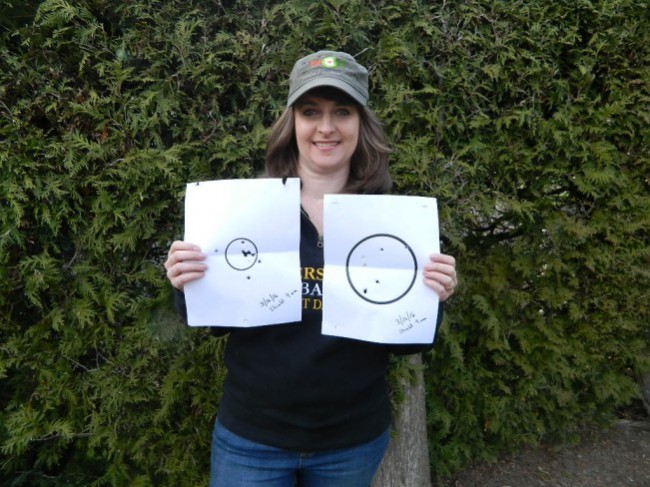
One the best ways you can learn to shoot more accurately is in the famous saying, “Aim small, miss small.” You can make your own targets by simply taking 8.5×11-inch paper and drawing a 6-inch circle. Use another sheet of paper to make 4-inch and 3-inch circle targets. Take a third sheet of paper and draw a couple of 2-inch circles, and then a few 1-inchers. For any of these targets you can fill in the circle with a marker so you can see it clearly.
Start at a distance from which you feel comfortable and confident shooting. Shoot a 5-shot group into your 6-inch target. As you keep your hits in the center of the circle, for your next group try the next smaller target. The smaller the aiming point, the easier it is to focus. If you’re able to keep all five shots inside the 1-inch circle, it’s time to increase your distance and add more challenge.
Julie gives excellent, practical advice. It sounds so easy, doesn’t it? Five shots in a 6-inch target, from a distance you feel comfortable at? Maybe you’ll rock that level, but as you move back and as that circle gets smaller and smaller, the difficulty will increase, for sure!
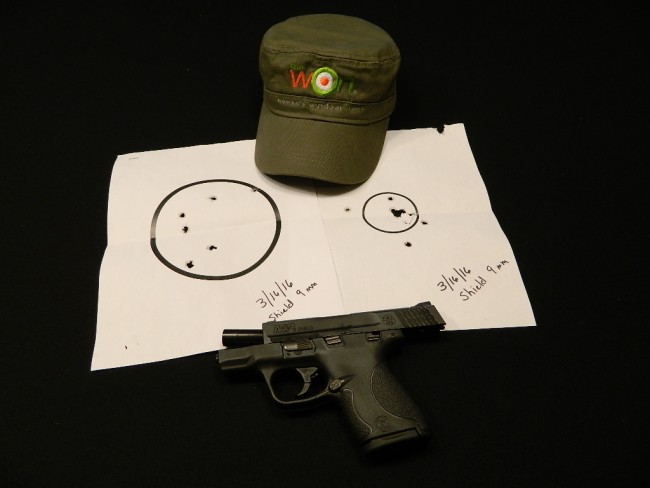
Since my daughters were home on spring break, we hit the range and gave Julie’s drill a try. Neither of my daughters had been able to shoot since just after Christmas, when we’d spent a blustery, foggy day at an outdoor range. Julie’s circle drill proved to be an excellent workout for all of us. The targets were simple to make—just some paper and a Sharpie. I made a few “master copies” one night when I had some extra time, and then ran off some photocopies at my office.
We all started out OK in the larger circle, but once we reduced the diameter and shot at the smaller targets from an increased distance, our rustiness became apparent. It’s great to have a drill that we can work with over time to increase our accuracy and get us back into shape after our long, cold winter!
Whatever your favorite drill might be, make sure you allow enough time to work on your fundamentals. Watch your stance and make the most of every second you have at the range. (If you’re unsure if your stance is working for you, check out this article I recently wrote about stances!)
Whether you try Julie Golob’s drill or have another plan of what you want to work on, the important thing is to get out there and shoot! The more you practice, the faster you’ll be ready for whatever the future months hold. Happy spring training and happy shooting!

Annette Doerr is a freelance outdoor writer and business services consultant living in suburban New York. This married mother of two is an NRA Certified Pistol Instructor and Range Safety Officer. Annette is not only passionate about the sport of shooting, she also loves helping new shooters get involved, especially women and teens. An active equestrian, she enjoys riding her American Quarter horse, Cody. She volunteers in greyhound rescue and adoption, and shares her home with Casper, a rescued racing greyhound, along with her her cat, Tony, and her husband, Bob. Visit Annette at WeShoot2.com, her personal blog. View all posts by Annette Doerr