
A few years ago, while planning a dinner, I looked in my freezer and found, hidden in the bottom, a plastic bag of freezer-burned venison. Disgusted, I carried the icy block to the trash. Not only had the meat gone to waste, but also it had taken precious room in my freezer all year long.
Luckily for me, I found a solution to my venison storage issue of years past. A friend of mine in North Carolina taught me the wonders of canning, by using a pressure canner. I grew up watching my mom and grandpa use one for tomato and apple sauce. When I married and had my own house and garden, I canned salsa and peppers every year using my grandpa’s old Ball Blue Book of Canning, with hot water baths.
My mom always warned me of the horrors of pressure canners. “Grandma had a pressure canner blow up once in her kitchen. They are very dangerous,” she said. Well, against the wishes of my mother, I ordered a pressure canner and bought new jars, lids and bands. All I had to do was wait for the first harvest of the year.
Pressure canning is a very easy process, as long as you follow all the steps and are careful not to leave anything out. Read all the instructions that come with your pressure canner before you begin. If you have never canned before, you will also need to learn how to prepare the jars, bands and lids. I prepare my jars in the dishwasher, on the sterilize mode, keeping it closed until I am ready to use each jar. I keep the lids and bands in a bowl of hot water on the counter near my work area.
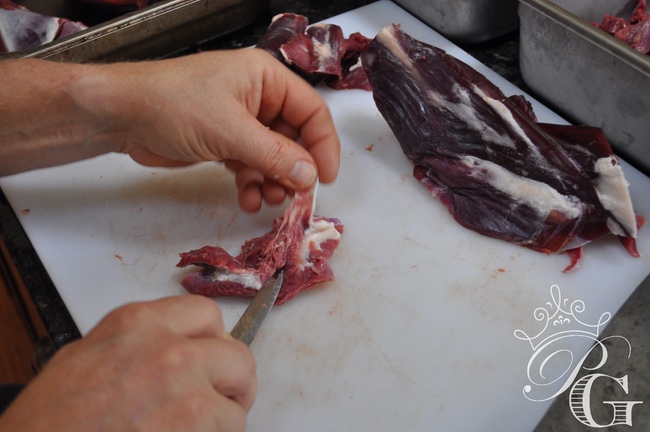
Preparing the meat
Cut raw, cool meat into 1-inch cubes or strips, removing any excess fat. Rinse in a strainer under cold water.
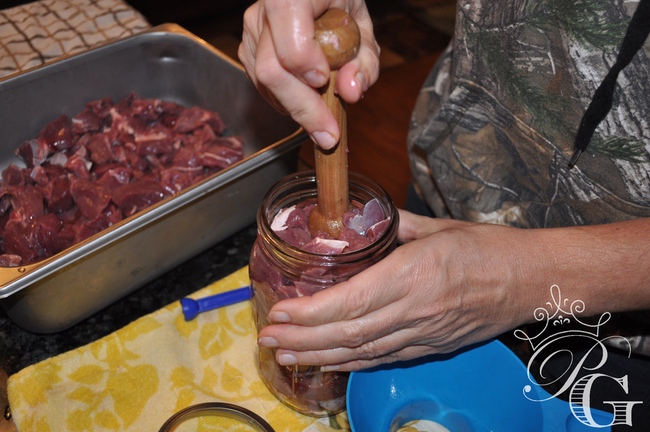
Packing the jars
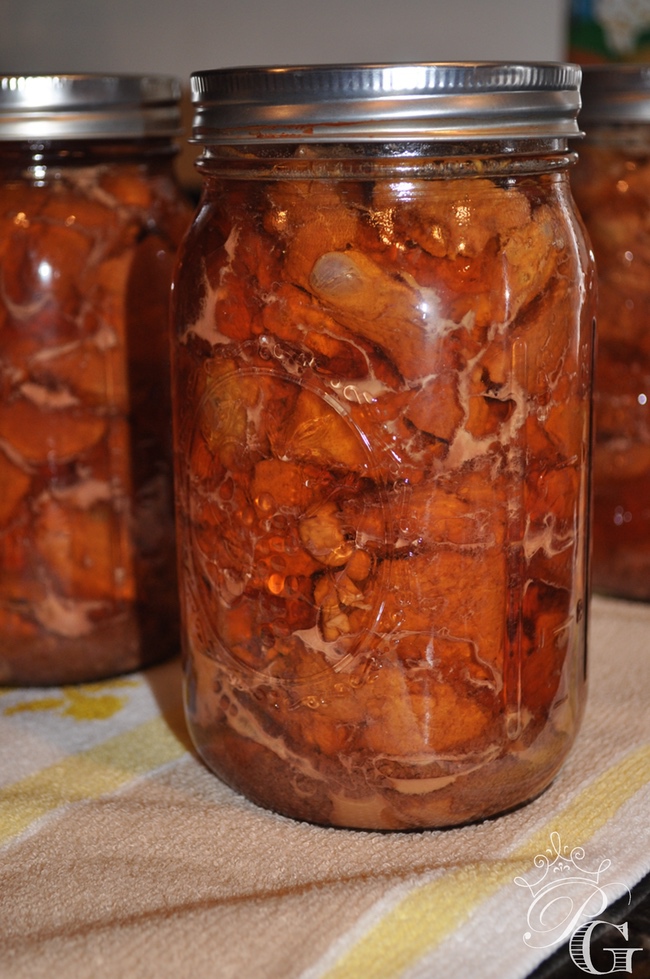
Pack meat into quart-size jars leaving 1 inch of headspace. Pack the meat down with the back of a wooden spoon or tart shaper to remove excess air bubbles.
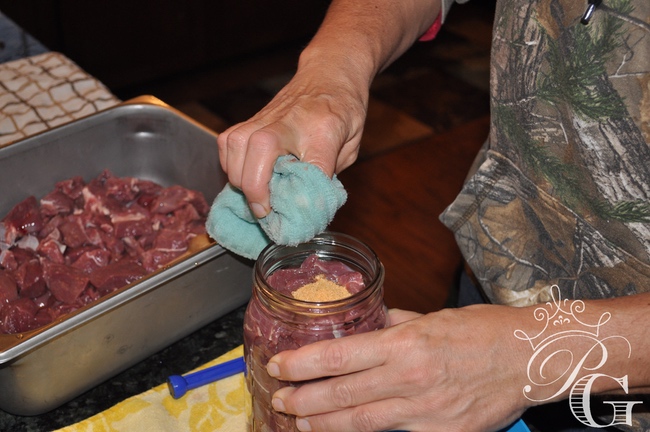 Then sprinkle about 1/2 teaspoon of non-iodized salt (to prevent clouding) and 1/2 teaspoon of Mrs. Dash over the meat. DO NOT ADD ANY LIQUID. Wipe the jar rims with a damp cloth and put lids and bands on. Tighten by hand. Put jars inside pressure canner.
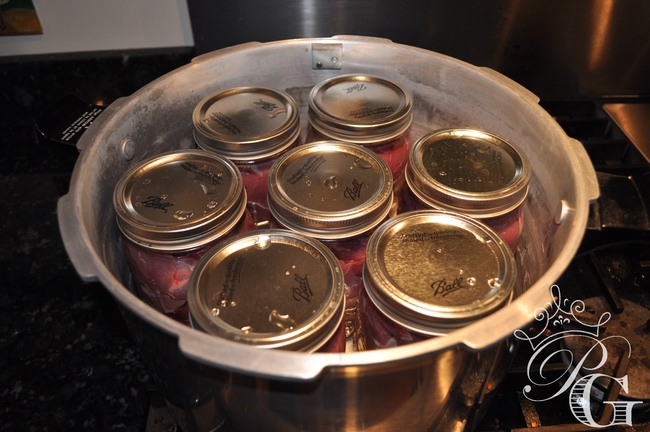
Canning the meat
Following the directions that come with your pressure canner. This is where you want to be really careful, not missing a step. Process at 11 pounds of pressure for 90 minutes.

Voila! You now have your canned venison that can be stored on shelves in your pantry, rather than taking up space in your freezer. When the meat is processed, it creates its own juices. Dinners wills be as simple as opening 1 or 2 jars.
Ingredients:
2 tablespoons unsalted butter
2 tablespoons flour
1 quart canned venison
Noodles, gnocchi or mashed potatoes
Make a roux by melting 2 tablespoons of fat (I use unsalted butter). Stir in 2 tablespoons of flour into the hot fat. Cook until browned. While stirring, slowly add the liquid from your jar. Bring to a simmer and continue stirring to avoid lumps.
Add your venison to the gravy. Heat until the meat is warmed through. Sometimes I add a little water if the gravy becomes too thick.
Serve over noodles, gnocchi or mashed potatoes.
I also have an amazing recipe for utilizing venison tenderloin.
Ingredients:
1 quart canned venison
2 tablespoons olive oil
2 garlic cloves
1 can beef stock
1/2 cup red wine
1/2 cup heavy whipping cream
1 can white beans
Fresh green beans
Gnocchi
Cut venison into cubes. Sauté garlic in olive oil. Add meat to oil and brown. Put meat in crockpot and cover with beef stock and dry red wine. Set your crockpot to low or high, depending on what time you want to serve the meal.
Cook gnocchi 20 minutes before you are ready to eat. Remove everything from crockpot and put in a large pot. Being to a simmer and add heavy whipping cream until it reaches desired consistency. Then add your white beans and fresh green beans. Cook until green beans are tender crisp. Add your gnocchi and serve.
As my father-in-law always says, “A recipe is only a guide for your imagination.” I am sure there are many other ways you can serve your canned venison and different things you can add to your ragu. Hopefully someone in my family will tag a deer this year. I am looking forward to restocking my shelves. It’s a great feeling knowing I won’t have to find room in my freezer to pack meat this year, although, I should throw out those sugary freezer pops that slid d

Michelle Cerino, aka Princess Gunslinger, first entered the firearms industry in 2011 as co-owner, president and trainer at a national training company. She immediately began competing in both 3-Gun and NRA Action Pistol, becoming a sponsored shooter. Michelle is currently a columnist and Managing Editor of Women’s Outdoor News, as well as owner of Pervenio LLC. She also manages social media for Vera Koo and GTM Original. Michelle encourages others to step out of the comforts of home and explore. View all posts by Michelle Cerino
I just canned for the first time today and followed the step by step instructions. Now that the jars have cooled I have little white pieces floating in the juice. Can you tell me what that might be? Did I make a mistake somewhere in the process?
10 pounds pressure for 90 minutes
Clean fat free (the best I could) meat packed in with canning salt to top it off.
Let stand in the pressure cooker for 90 minutes after to depressurize.
Any help would be nice. Thanks.


Jason,
I am so excited you tried canning with a pressure cooker. So far this season I put up 21 quarts of venison. The white pieces you are seeing are cooled fat. No matter how hard you try, there is always some fat left within the meat. Once you reheat it, the fat liquifies again and adds flavor to your meal. There is nothing wrong with it, and no need to worry.
Good luck and I hope you enjoy the recipes!