
Over the years, I’ve heard people say, “Your gun is only as good as the optics on top of it.” The months between hunting seasons are an ideal time to upgrade our optics and head to the range. Mounting a premium scope will improve our chances of homing in on our targets when big-game season arrives.

Mia and the Little Gal is sponsored by Remington.
There are numerous choices in brands, quality, crosshairs, warranties and such when you’re choosing a scope. No matter which scope you decide to put atop your trusty rifle, you need to ensure that you have it mounted properly. A loose or askew scope will be of no use in the field.
Once you have the scope you want, you’ll need to mount it with the appropriate scope rings. These are sized to the tube diameter of your scope, which you can find in the scope’s manual or handbook. You can also contact the manufacturer or ask the clerk at the gun counter of your favorite firearms dealer for help.
Tools
You’re going to need a few firearm-specific tools to do the job. If you’re a gun geek like me, you might want to invest in a scope-mounting toolkit. Prices range from $80 to $200, so you should consider how much use you’ll get out of it before committing to the purchase. A properly mounted and cared-for scope will stay true for years.
Tools and supplies you’ll need:
Gun rest or vise
Adjustable torque wrench or quality driver set
Thread-locking agent
Alignment bar
Lapping bar with handle
Lapping compound
Degreaser
Small bubble level
Laser bore sight (not required, but it will save you some ammo when you’re sighting in at the range)
Let’s get started.
Safety First
Once you have the scope, rings and tools, the first thing you need to do is make sure the rifle is unloaded.
Trial Run
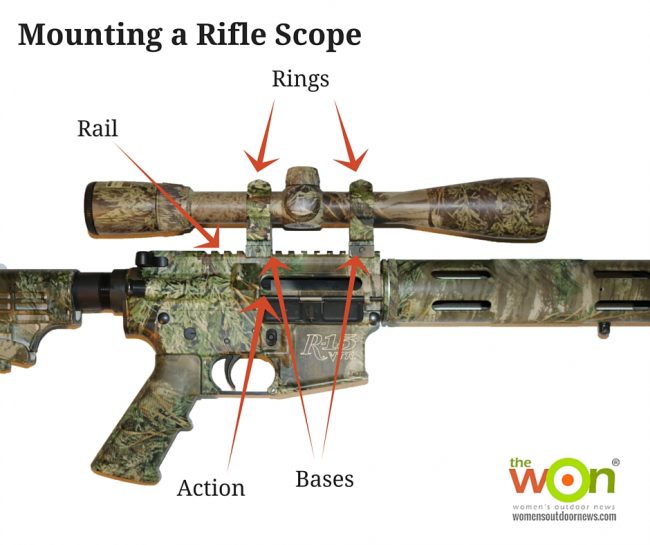
Gather your scope, bases and rings and loosely fit them together for a test run. Look at the setup to see where the mounts will attach to the rifle. Note where the rings will sit on the tube of the scope so they are flush. Hold them in position over the receiver to make sure the mounts and rings won’t interfere with the bolt or action of your gun.
I’ve found that doing this imperfect trial run helps with spotting inaccurate parts before they’re locked and tightened onto the firearm.
Mount the Bases
Now that you’ve previewed the process, begin by mounting the bases. Use a thread-locking agent as you attach them to the rail. Use caution so you don’t cross thread or overtighten the screws. Alternately tighten them on opposing sides of each base, so as to not have one side overtightened before the mount is seated.
Attach and Align the Rings
Next, attach the rings to the bases. Tighten the screws in a similar fashion as you did with the bases, using a thread-locking agent and alternating between sides.
Once your rings are mounted, you’ll need to use your alignment bar to check that they align with one another. If there are imperfections, use the lapping compound and lapping bar to smooth the rings into alignment. Be sure to use the degreasing agent to clean off the remaining lapping compound when you’re done.
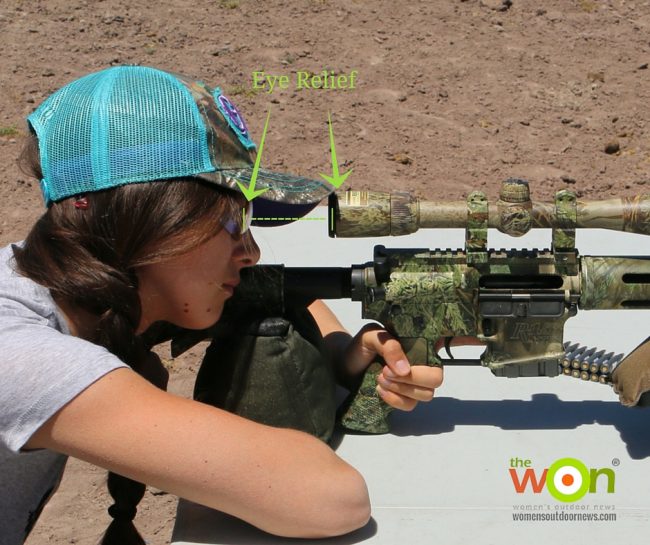
Determine Eye Relief
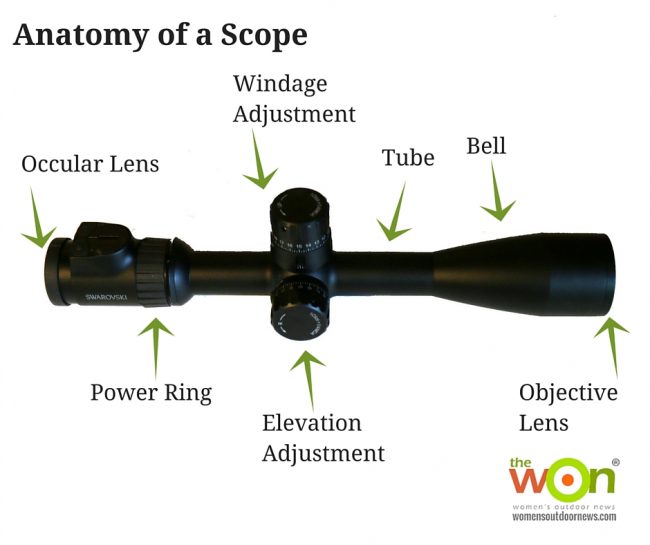
The eye relief of the scope is the distance from the ocular lens of the scope to your eye. Adjust the scope to its highest power and place it in the rings. Shoulder the firearm, pointing it in a safe direction, and look through the scope. Slide the scope forward or back until the sight-picture is clear and the black halo around it is at its smallest point.
It can be helpful to have a friend for this process. They can hold or mark the location at which the scope should be set when the rings are tightened.
Level
For any scope to be accurate, the crosshairs must be level. Set the bubble level atop the elevation adjustment housing to ensure the crosshairs are level. Take care not to move the scope forward or back, thereby changing the eye relief. Once you’ve got the proper eye relief and the crosshairs are level, you can tighten down the rings.
You can now use the laser bore sight to get your crosshairs hitting, or close to hitting, paper targets. This will save in ammunition costs down the road. Be sure to head to the range for finishing touches and final adjustments.

The Women's Outdoor News, aka The WON, features news, reviews and stories about women who are shooting, hunting, fishing and actively engaging in outdoor adventure. This publication is for women, by women. View all posts by The WON


