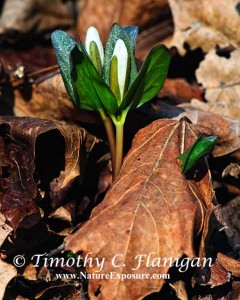
Cameras are time machines that stop time and capture special moments so that they can be shared with others. Sharing images is a great joy and as spring’s glory explodes, image capture opportunities abound. Some of the most compelling photo subjects are early spring wildflowers. Their appearance is proof that winter’s grip on the land has been broken.
Now that winter slumber is past, these wild beauties must get to work, producing new flowers that become seeds to foster a new generation. Pulled from the soil by the magnetism of sunlight, they delight our eyes and inspire the photographer’s zeal. Here are some tips for capturing spring wildflowers in images that display these special plants in their finest beauty.
To smell the fragrance of a wildflower, we must get down to its level. Wildflower photography demands the same. To obtain the most flattering and realistic angle of the subject, we must position the camera and lens on the same plane, or perhaps slightly below the subject. A photographer friend calls this “wet belly” photography. It is also wet knee photography, but a set of carpenter’s knee pads will protect your knees and save your blue jeans.
Pleasing wildflower images can be obtained with virtually any camera if you apply the following tips for success, but the best equipment for the task includes a Digital Single Lens Reflex (DSLR) camera that will record RAW format images, a MACRO lens, and most importantly, a tripod that can be secured in position at ground level. A remote shutter release is also a plus.
Natural sunlight is the most flattering for wildflowers. Image capture should be accomplished early or late in the day when the sun is low in the sky, casting detail-illuminating side lighting across petals and leaves. Locate plants that are illuminated from the east or west side, not directly. Such light greatly enhances the flower’s finest detail by casting minute shadows of them. If the plant is shaded by a tree or another plant, simply wait a few minutes for the sun to move in the sky.
 Adjust the tripod to an angle that places the camera lens at ground level so that the plant is displayed in its natural state and not distorted by an odd or especially unflattering downward angle. Note: a slight down angle can be used to reveal the interior of blossoms. Compose the flower’s image in the camera’s view finder as you wish the image to appear in print and prepare to make some important decisions about exposure setting and the desired depth of field within the final image.
Depth-of-field, DOF, refers to the depth of sharp focus in an image. For macro photography, this can be measured in inches or fractions of inches. The main consideration is how much of the flower you wish to be included in sharp focus. Attendant to that decision is how sharp do you wish to render the flower’s background. Soft-focus backgrounds flatter the main subject and sharp-focus backgrounds compete with it.
Depth-of-field is controlled by the “aperture” setting on the lens; a large lens opening, (aperture), such as F-2.8 renders very shallow focus depth while small apertures such as F-16 or F-22 extend it. Most DSLRs offer a depth-of-field preview button, commonly located at the edge of the lens mount that enables a quick and easy preview of your selected settings without taking a photo.
 Wide apertures admit more light and require fast shutter speeds and vice-versa. Modern cameras will select matching settings for you, depending on the shooting mode selected. Selecting the “Aperture Priority” mode permits the photographer to select the desired lens opening size, (F-stop) while the camera selects a matching shutter speed to render a properly exposed image.
Choosing the “Shutter Priority” mode enables manual selection of the shutter speed while the camera automatically matches your selection with the appropriate lens aperture. You may with to further automate your flower photography by selecting the small “Flower” icon offered on some camera models. That setting will capture respectable wildflower images, but the shutter/aperture combinations are computed and set by the camera. It is wise to avoid the full automatic camera mode for such photos.
With shooting mode decisions made, select a focus point that is partially within the desired depth-of-field and not on a portion of the flower closest to or most distant from the camera lens. Doing so can place the entire flower fully within the sharp-focused portion of the image. This can be easily checked, prior to releasing the shutter, by pressing the depth-of-field review button.
The only thing left to do is release the camera’s shutter and record the image. At this ultra-critical moment it is vitally important that the camera remain absolutely still. In macro photography, even the slightest camera movement causes blurring of the image. Here is where the secure tripod and the remote release pay dividends in sharp images.
Physically touching the camera, lens or tripod transmits minute movement from our bodies. The camera’s delayed shutter option mode offers another effective method of firing the camera in a hands-off mode. Simply select the camera’s timed shutter release option, depress the shutter release and avoid contact with the photographic equipment while the camera captures the image, untouched by human hands.
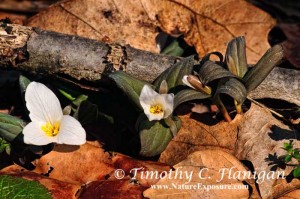
These early-blooming, tiny and rare Snow Trilliums, Trillium nivale, of the Lily family, are true harbingers of spring that surge quickly to life as winter’s snow melts into memory. To capture their dwarf glory, the camera and lens must me placed on their very personal level. Slightly up-angle images are even more flattering. Try shooting wildflowers located on inclined terrain, from slightly below their position.
To see Tim Flanigan’s work online, visit Nature Exposure. Visit his blog here.
Tim Flanigan has been producing top-quality photographic images for the print media for more than 30 years.Tim, and his wife, Debbie, operate Nature Exposure, an outdoor writing and photography marketing business in Bedford, Penn. View all posts by Tim Flanigan
Great great article Tim!!! I’m going to be sharing this with many 🙂
absolutely love the “Wet belly photography” That is certainly the case! We are just starting to see the earliest wildflowers here – I can’t for the woods to be in full bloom!